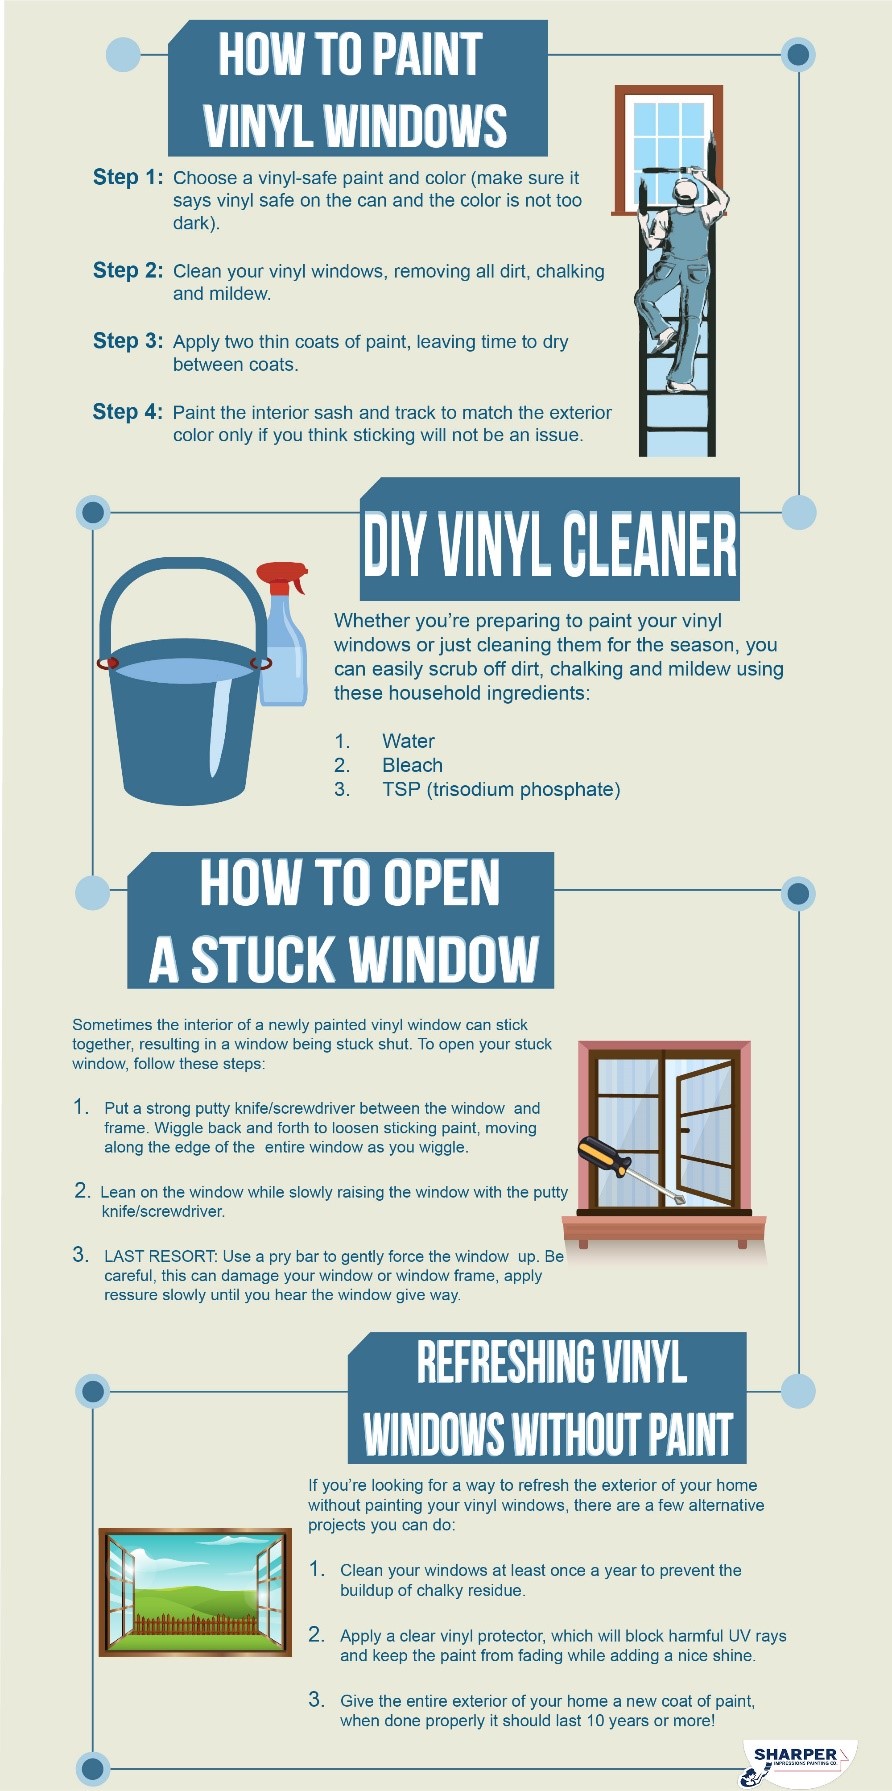
Looking to refresh the exterior of your home this season? Painting your vinyl windows is a quick and easy way to add a pop of color to your house, giving it major curb appeal. This project is simple if you have the right tools, but requires a bit of knowledge about vinyl windows and vinyl-safe paint before beginning. We’ll break down the process of how to paint vinyl windows into a few easy-to-follow steps.
Should You Paint Vinyl Windows?
Today, all this has changed. Customers want to have the option to change the color of their vinyl windows and siding on the exterior of their homes. Paint manufacturers listened, and in the last five years, they have been making vinyl-safe paint as a cost-effective way for customers to update the colors on the exterior of their home. This new paint even lasts longer on vinyl surfaces then on wood surfaces. This is much cheaper than replacing your vinyl frames all together, especially for those looking to update their vinyl every few years.
Color Selection: Not Too Dark
The first step in painting your vinyl windows is choosing a color. One thing you should consider when choosing a color is how dark it is. The one major concern with vinyl paint is that if a color is too dark, it can cause warping of the vinyl windows from the sun. Most vinyl-safe paint is formulated to prevent warping with darker colors, but how dark you can go over lighter windows is still a concern, so not all vinyl-safe paint brands make darker color option. Be sure to read the paint can, talk to the paint store manager and a professional painter before buying too dark of a vinyl safe paint.
Window Preparation
Before you can start painting your vinyl windows, you have to prep them. It is absolutely necessary to clean all window frames so the new paint can stick to the glossy and often chalky surface. Make sure all mildew and dirt is removed, which can easily be done with a white rag and a mixture of water, bleach and TSP (trisodium phosphate, a cleaning agent).
After using this cleaning mixture to scrub the vinyl, use a hose, wet rag or low pressure power washer to rinse all residue off. Let the vinyl dry, then check to make sure there is no remaining mildew or chalk on the window frames. Mildew grey spores should be completely gone. The best method making sure the chalking is gone is to lick your thumb and run it over the cleaned window. Very little chalk/old window color should come off on your thumb, meaning the vinyl is clean and ready to paint.
Applying the Paint
When you paint vinyl windows for the first time, you’ll definitely want to do two thin coats of paint. Some paint manufacturers require a primer, while others have self-priming paint. Make sure you read the label beforehand to see if you need to prime the vinyl prior painting. When painting, apply thin coats—NOT thick—to the vinyl. Allow proper drying time in between applications.
You can use a brush or roller to apply the paint, or you can spray it on for a smooth factory-type finish. After allowing both coats to properly dry, your house will have a refreshed look and updated curb appeal! However, there is still one more factor to consider before your vinyl windows are truly done.
Don’t Forget the Interior Sashes
Once you paint the exterior of your vinyl windows, your house will look great from the street. But when you open your windows, you’ll still see the old color on the interior sashes and tracks. If this doesn’t bother you or you don’t want to deal with a complicated painting project, you can leave the interior as is. However, if you want the interior sash to match the color on the exterior of your vinyl windows, painting them is the best option for cosmetic purposes only.
Since this requires careful painting on the interior of the window frame, you’ll want to take precautions so your windows don’t stick when they are closed. Because vinyl windows close tightly, there is a risk of sticking if the newly painted surfaces touch for a long period of time, like when the window remains closed over the entire winter season. One solution is to run Vaseline along the points of contact to keep these areas from sticking. Another is to open your windows repeatedly for the coming weeks to prevent sticking.
How to Open a Stuck Window
It’s important to allow enough time for the interior of your windows to dry after being painted, so the window doesn’t stick to the sash when closed. If the windows do stick, which is normal and often occurs, don’t fret!
Try taking a putty knife and putting it in the edge of the window. Wriggle the knife back and forth along the frame to loosen any dried paint. Lean on the window while slowly pushing it up with your hands.
If the putty knife isn’t enough the break the seal, try putting a block of wood next to the frame and tap the block with a hammer to crack the dried paint inside. Again, carefully push the window up, loosening one side at a time. If it still hasn’t opened, you can slowly use a pry bar to gently force the window up. However, this may damage the window or frame, and should only be used as a last resort.
Refresh Your Windows without Paint
To keep your vinyl windows looking fresh without painting them every year, clean the exterior of your windows at least once a year. This will make them brighter and less chalky from oxidation caused by the sun. After cleaning, you can use a vinyl reviver, which is similar to a clear coat, to give your windows extra shine. The color will remain the same but the revivers have UV protectants in them, so the vinyl will resist fading for a few years.
Of course, you can also paint the rest of your house, making a larger statement than just painting your vinyl windows. As the color of your vinyl fades over time, the windows will become less of a focal point, which is why many homeowners choose to have the entire house painted a new color instead. This is obviously a much larger and more time-consuming project, which is why we recommend leaving major house painting projects like this to the professionals at Sharper Impressions Painting.